
PRO CNC Quick Build instructions with Timesaving Tips and Tricks:
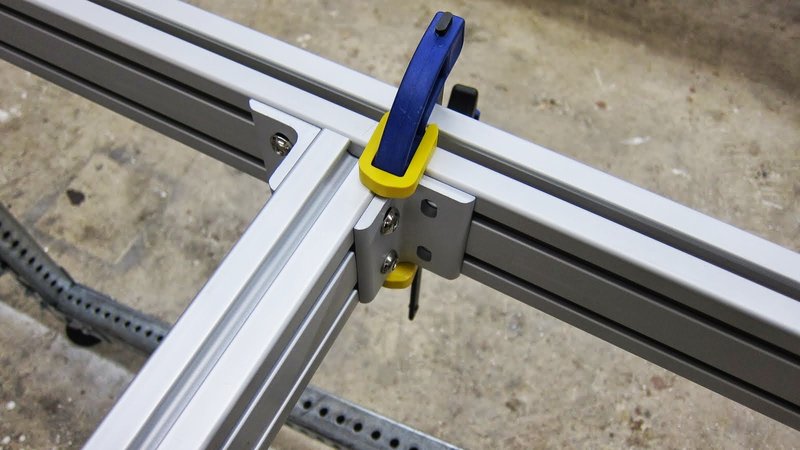
Use a square when attaching the L brackets to the ends of the cross supports. Tighten the provided screws down when they are square and centered.
![]()
![]()
Starting with the two outer cross braces, finger tighten the attachment of the cross braces to the rail extrusion. Use soft jaw clamps to hold things in place, and make sure the clamp spans both pieces of extrusion. If you make the distance between cross braces consistent, programming and attaching a spoil board (one of the last steps) will be much easier.
![]()
![]()
At this point square and level the machine base. Make adjustments as needed and start tightening the machine base (and the leg kit if applicable). Measure diagonally to confirm squareness, make sure the legs are plumb and the surface is level. If you built a custom leg kit you might need to shim the machine base level. You may need to tighten, check, loosen, adjust, and tighten a couple of times, but getting things square and level now will make later assembly easier.
![]()
Section 3: V-Con Clamps and Rails
Now that your base frame is together, you can begin installing the V-Con linear motion components.
Time Saving Tip (TST) - Pre assembling the V-Con clamps will make installation faster. You can start on one side and slide them in from the end.
![]()
Space the V-Con Clamps out evenly along the X rails. If you align the V-Con clamp centered on the cross braces, it will make spoil board installation much faster. You can locate the cross braces even though you won’t be able to see them under the spoil board.
![]()
Next, install the 1018 Steel Flatbar. Make sure the CRS Flatbar is completely seated before tightening the set screws. Your rubber mallet and bar clamps will work well for this. Next, tighten the set screws for the steel to the V-Cons, then tighten the V-cons to the Extrusion Rail.
![]()
![]()
Section 4: Install the Gear Rack
(TST) - Pre install the hardware in the PRO Gear Rack and slide it in the end of the extrusion. Gear teeth should be facing down.
![]()
![]()
The Gear Rack is not centered on the extrusion. It should be spaced 1” from the edge of the Extrusion Rail on the back side of the machine. You can see this highlighted in green.
![]()
Section 5: Riser Assembly CRP420-00
There is both a right and a left riser assembly, these are mirror images of one another. Pre assemble these on your workbench. Occasionally there might be some powdercoat that builds up in the threads, this will be evident if your bolt binds as you are trying to thread it in.. If this happens use a M8 Tap for clearing the threads. If you don't have a tap use a couple drops of vegetable oil and an M8 bolt will also work.
![]()
![]()
![]()
When you install the Riser Assembly onto the rails, you will need to make some adjustments to the V-Con Clamps so you have even tension along the entire length of the rail. Make sure each riser rolls smoothly independently. It is best to tighten the sled assembly as it saddles a V-Con Clamp, this will prevent you from flexing the steel rail as you set the tension. When everything is rolling smoothly, tighten all 3 connection points on the sled assembly (two bolts holding the sled to the plate, and the jam nut on the adjuster bracket).
![]()
![]()
Now is a good time to install the 4 X Bumper plates, this will prevent your riser from rolling off the end unexpectedly. We will use the plate to align the gantry, so leave the rubber bumpers off until you have completely assembled your gantry.
Align the front of the extrusion to the front Gusset.
![]()
![]()
Your riser extrusion should be aligned like this:
![]()
Use your Bar clamps, and lock each riser against the X bumper.
![]()
![]()
![]()
The PRO riser assembly includes some extra hardware for easy connection of the rack and pinion drives. Each side has an M8 x 10mm hex head bolt and washers to connect the tension bracket, and a 90mm tension bolt. Proper use of these components is outlined in Section 8: Rack and Pinion Drives.
Section 6: Gantry CRP430-00
Set your gantry on top of the risers, and hand tighten all of the gussets. The gantry is slightly longer than the distance between the outside of the riser extrusions . Try and center this overhang.
![]()
Make sure the gantry is square and level, and then tighten all of the fasteners.
(TST) - Pre assemble and slide your V-Con Clamps on from the end of the gantry.
![]()
![]()
Use bar clamps and rubber mallet to seat the Cold Roll Steel into the V-Con Clamps. Like before, tighten the setscrews to the steel, making sure the steel is completely seated in the V-Con. Then tighten the V-Con to the extrusion.
![]()
![]()
![]()
Install the gantry gear rack like the others, pre installing the t-nuts and sliding in from one end. The gear rack should be installed with the fasteners in the t-slot towards the rear of the gantry, with the teeth facing towards the front. Looking down on the gantry your gear rack should face down, and be spaced 4” from the right side.
CRP432-00 Carriage Assembly
![]()
This sub-assembly can be pre-assembled prior to installation on the machine. Pre assemble components to the Gantry interface plate as shown.
![]()
When you install the Back gantry support bracket, make sure to only hand tighten the 4 socket head screws on the back side. These will be tightened after the system is aligned on the rails.
![]()
![]()
Once this subsystem is assembled, it can be installed on the machine, and the tension sleds can be adjusted. First tighten the sled assembly on the Gantry interface plate (CRP430-01, which is part of the CRP432-00 assembly), then tighten the sled on the Back gantry support bracket, again tightening over a V-Con clamp.
![]()
Confirm all 6 V Bearings are making smooth contact, then tighten down the sled connection screws, followed by the 4 socket screws holding the back gantry support bracket on.
![]()
![]()
Section 7: Z Axis Installation
Once the carriage assembly for the gantry is installed, the Z axis can be installed to the CRP430-01 plate using the 8 supplied M6 screws. Use a straight edge on one side of the plate to square the Z to the 430 plate.
![]()
Section 8: Rack and Pinion Drives
X Axis Rack and Pinion Drives
The rack and pinion drives can now be installed on the risers.
![]()
See the PRO rack and pinion instructions for specifics on assembling the R&P drives:
www.cncrouterparts.com/pro-rp-instructions-p-220.html
Once the drives are assembled, these can be mounted to the R&P attachment bracket.
![]()
![]()
Note the use of the M8 x 90mm hex bolt in place of the standard tension bolt – this makes for easier tension adjustment on the 420 assembly. Additionally, the tension bracket for the R&P unit is mounted to the CRP420-04 plate with a short M8 hex bolt and washer to avoid interference with the V-rollers on the back side of the plate.
![]()
![]()
Y Axis Rack and Pinion Drives
The rack and pinion drive for the Y axis is mounted on top of the gantry, as seen below. This unit does not require the rack and pinion tension bracket, but instead makes use of the CRP430-03 back gantry support bracket to apply tension.
![]()
![]()
![]()
First of all, thanks for your purchase of a CNC Router Parts PRO CNC Machine Kit - we hope you'll be pleased with the performance and flexibility of your new system. The precision you get out of the machine is partially a function of the time and effort you put into building and calibrating it, and this guide can help you with some of those activities.
Now onto the fun stuff - putting your machine together. While the drawings for our plans contain the majority of the information you will need to assemble your machine, there are a few pointers we'd like to pass along to make the construction of your machine go more smoothly. Many thanks to our previous customers, who have helped develop some of these strategies.
General Building Tips
We recommend going over the plans and making sure you have all of the listed parts. Exploded view drawings with a complete bill of materials broken down by subsystem are available in the plans section of our website:
www.cncrouterparts.com/machine-plans-c-44_24_38.html
Your machine is packed by sub-assembly, which is helpful, as there are a lot of parts! If somehow you are missing parts from a sub-assembly, let us know right away, rather than robbing parts from another sub-assembly - we can get things out to you quickly so you can avoid confusion as to what parts go with what. Also, If you find a trick that makes things easier that you don’t see on our site, please let us know, we would love to add it.
We recommend building the machine in order of the subassemblies, first the Steel Leg Kit (or your own custom table), followed by the Machine Base (CRP410-00), the Riser Assemblies (CRP420-00), the Gantry (CRP430-00), the Z-axis (CRP440-00), the Rack and Pinion Drives (CRP 301-00), Cable Management, and finally electronics and software.
Tool List:
- Allen wrenches (metric and standard)
- Rubber mallet
- 13mm or ½” open face wrench
- 13mm or ½” socket and driver
- 24” (or longer) level
- Soft jaw bar clamps (at least 2)
- Measuring tape
- Square, Screw Drivers
- Magnetizer (from Staples)
- M8 Tap (optional)
Section 1: Legs / Foundation
If you are building your own base, you can skip most of this section. The only thing to consider is that your base will need to fit inside the V-Con clamps on the underside of the machine frame. For our standard 4’ gantry PRO kits, this means your table top needs to be 49” in width or less.
If you purchased our 14ga Galvanized Steel leg kit, this is a simple, strong, and versatile system for getting your machine at working height. Install the leveling feet so they are almost but not quite all the way into the threaded ends -- the feet are made for adjustment, so leave yourself a little room to go up and down.
A 13mm or ½” socket with a impact driver is a great tool to tighten the leg kit down, but wait until your machine base (section 2) is assembled, square and level before you tighten the leg kit fasteners to their final position.
If you want increased rigidity of your legs, making a shelf that spans the level cross braces can help. Adding weight to this shelf can also stabilize the machine fast moves. Time Saving TIP(TST) If you’re using our Leg kit, or any leg that will attach to the bottom of the rail extrusion Skip to section 3 and slide the V-Con clamps onto the lower part of the extrusion. The bracket that attaches the leg kit to the Extruded rail will prevent the V-Con Clamps from sliding past. If you skip this tip you can still install the Roll in T Nuts after the fact, it will just take a little more time.
![]()
Attach the X Axis Extruded Aluminum Rails to your Leg Kit with the provided hardware. The legs are designed to be centered in the extrusion, so measure, and finger tighten the nuts.
![]()
Section 2: Machine Base CRP410-00If you purchased our 14ga Galvanized Steel leg kit, this is a simple, strong, and versatile system for getting your machine at working height. Install the leveling feet so they are almost but not quite all the way into the threaded ends -- the feet are made for adjustment, so leave yourself a little room to go up and down.
A 13mm or ½” socket with a impact driver is a great tool to tighten the leg kit down, but wait until your machine base (section 2) is assembled, square and level before you tighten the leg kit fasteners to their final position.
If you want increased rigidity of your legs, making a shelf that spans the level cross braces can help. Adding weight to this shelf can also stabilize the machine fast moves. Time Saving TIP(TST) If you’re using our Leg kit, or any leg that will attach to the bottom of the rail extrusion Skip to section 3 and slide the V-Con clamps onto the lower part of the extrusion. The bracket that attaches the leg kit to the Extruded rail will prevent the V-Con Clamps from sliding past. If you skip this tip you can still install the Roll in T Nuts after the fact, it will just take a little more time.

Attach the X Axis Extruded Aluminum Rails to your Leg Kit with the provided hardware. The legs are designed to be centered in the extrusion, so measure, and finger tighten the nuts.

Use a square when attaching the L brackets to the ends of the cross supports. Tighten the provided screws down when they are square and centered.


Starting with the two outer cross braces, finger tighten the attachment of the cross braces to the rail extrusion. Use soft jaw clamps to hold things in place, and make sure the clamp spans both pieces of extrusion. If you make the distance between cross braces consistent, programming and attaching a spoil board (one of the last steps) will be much easier.

At this point square and level the machine base. Make adjustments as needed and start tightening the machine base (and the leg kit if applicable). Measure diagonally to confirm squareness, make sure the legs are plumb and the surface is level. If you built a custom leg kit you might need to shim the machine base level. You may need to tighten, check, loosen, adjust, and tighten a couple of times, but getting things square and level now will make later assembly easier.

Section 3: V-Con Clamps and Rails
Now that your base frame is together, you can begin installing the V-Con linear motion components.
Time Saving Tip (TST) - Pre assembling the V-Con clamps will make installation faster. You can start on one side and slide them in from the end.

Space the V-Con Clamps out evenly along the X rails. If you align the V-Con clamp centered on the cross braces, it will make spoil board installation much faster. You can locate the cross braces even though you won’t be able to see them under the spoil board.

Next, install the 1018 Steel Flatbar. Make sure the CRS Flatbar is completely seated before tightening the set screws. Your rubber mallet and bar clamps will work well for this. Next, tighten the set screws for the steel to the V-Cons, then tighten the V-cons to the Extrusion Rail.


Section 4: Install the Gear Rack
(TST) - Pre install the hardware in the PRO Gear Rack and slide it in the end of the extrusion. Gear teeth should be facing down.


The Gear Rack is not centered on the extrusion. It should be spaced 1” from the edge of the Extrusion Rail on the back side of the machine. You can see this highlighted in green.

Section 5: Riser Assembly CRP420-00
There is both a right and a left riser assembly, these are mirror images of one another. Pre assemble these on your workbench. Occasionally there might be some powdercoat that builds up in the threads, this will be evident if your bolt binds as you are trying to thread it in.. If this happens use a M8 Tap for clearing the threads. If you don't have a tap use a couple drops of vegetable oil and an M8 bolt will also work.


When you install the Riser Assembly onto the rails, you will need to make some adjustments to the V-Con Clamps so you have even tension along the entire length of the rail. Make sure each riser rolls smoothly independently. It is best to tighten the sled assembly as it saddles a V-Con Clamp, this will prevent you from flexing the steel rail as you set the tension. When everything is rolling smoothly, tighten all 3 connection points on the sled assembly (two bolts holding the sled to the plate, and the jam nut on the adjuster bracket).


Now is a good time to install the 4 X Bumper plates, this will prevent your riser from rolling off the end unexpectedly. We will use the plate to align the gantry, so leave the rubber bumpers off until you have completely assembled your gantry.
Align the front of the extrusion to the front Gusset.


Your riser extrusion should be aligned like this:

Use your Bar clamps, and lock each riser against the X bumper.


The PRO riser assembly includes some extra hardware for easy connection of the rack and pinion drives. Each side has an M8 x 10mm hex head bolt and washers to connect the tension bracket, and a 90mm tension bolt. Proper use of these components is outlined in Section 8: Rack and Pinion Drives.
Section 6: Gantry CRP430-00
Set your gantry on top of the risers, and hand tighten all of the gussets. The gantry is slightly longer than the distance between the outside of the riser extrusions . Try and center this overhang.

Make sure the gantry is square and level, and then tighten all of the fasteners.
(TST) - Pre assemble and slide your V-Con Clamps on from the end of the gantry.


Use bar clamps and rubber mallet to seat the Cold Roll Steel into the V-Con Clamps. Like before, tighten the setscrews to the steel, making sure the steel is completely seated in the V-Con. Then tighten the V-Con to the extrusion.


Install the gantry gear rack like the others, pre installing the t-nuts and sliding in from one end. The gear rack should be installed with the fasteners in the t-slot towards the rear of the gantry, with the teeth facing towards the front. Looking down on the gantry your gear rack should face down, and be spaced 4” from the right side.
CRP432-00 Carriage Assembly

This sub-assembly can be pre-assembled prior to installation on the machine. Pre assemble components to the Gantry interface plate as shown.

When you install the Back gantry support bracket, make sure to only hand tighten the 4 socket head screws on the back side. These will be tightened after the system is aligned on the rails.


Once this subsystem is assembled, it can be installed on the machine, and the tension sleds can be adjusted. First tighten the sled assembly on the Gantry interface plate (CRP430-01, which is part of the CRP432-00 assembly), then tighten the sled on the Back gantry support bracket, again tightening over a V-Con clamp.

Confirm all 6 V Bearings are making smooth contact, then tighten down the sled connection screws, followed by the 4 socket screws holding the back gantry support bracket on.


Section 7: Z Axis Installation
Once the carriage assembly for the gantry is installed, the Z axis can be installed to the CRP430-01 plate using the 8 supplied M6 screws. Use a straight edge on one side of the plate to square the Z to the 430 plate.

Section 8: Rack and Pinion Drives
X Axis Rack and Pinion Drives
The rack and pinion drives can now be installed on the risers.
Nema 23:
![]()

Nema 34:
![]()


See the PRO rack and pinion instructions for specifics on assembling the R&P drives:
www.cncrouterparts.com/pro-rp-instructions-p-220.html
Once the drives are assembled, these can be mounted to the R&P attachment bracket.


Note the use of the M8 x 90mm hex bolt in place of the standard tension bolt – this makes for easier tension adjustment on the 420 assembly. Additionally, the tension bracket for the R&P unit is mounted to the CRP420-04 plate with a short M8 hex bolt and washer to avoid interference with the V-rollers on the back side of the plate.


Y Axis Rack and Pinion Drives
The rack and pinion drive for the Y axis is mounted on top of the gantry, as seen below. This unit does not require the rack and pinion tension bracket, but instead makes use of the CRP430-03 back gantry support bracket to apply tension.


New in: Instructions & Configuration